Adding a Notch to the Frontmost Wall 2×6
Then I decided I wanted the connecting 1×6 at the top of the forward most vertical 2×6 to sit flush. So I needed to make a notch in the 2×6 to achieve this. And here is another case where I will need to hide a board, to modify the one behind it. I just have to remember to unhide after.


I would need to adjust the blocking as well.
And I’ll copy the left side vertical 2×6 with the notch over to the right side.

And I did that so I could make a front upper corner brace that would sit flat against a vertical and horizontal face.
Modelling the Front Braces
I can copy and rotate a 1×6 45 degrees. Then position it. And from time to time, I use the measuring tape tool to quickly check distances. I did that a few times on the rear braces as well. I’m thinking of how many pieces I can get from standard board lengths as I’m working on the model. Trying to anyways.


And something was a bit off, so I had to work it back into place. Again, this is how it goes when modelling. The brace needed to be moved back so it would be flush to the other faces. As I need to draw lines at the intersection points, so the boards need to be touching. Then trim it to shape.
I liked how that looked so I can copy it, rotate it, reposition it, then move it over to the other side of the shed.

Roof Strapping on the Firewood Drying Shed
For the roof strapping, I’ll first create a rectangle that is sitting flush across the rafters. Those last two grid lines I created at a zero offset from the edges. So they would be placed right along the edge. Then I’ll slide that up to be flush with the front plane of the roof.


And pull that out to the proper length.
(Disclaimer: As an Amazon Associate I earn from qualifying purchases. Thank you for helping to support my content this way. )
Adjusting the Side Overhangs
Then I decided to increase the overhang on the sides so I moved the outermost 1×6 and extended the length of the connecting boards. And I can repeat those steps on the right side of the shed.


Add more Roof Strapping
I’ll copy the first roof strapping board to the rear edge of the shed roof. And I needed to make some adjustments so everything was flush.


And I’ll fill in the space with more strapping boards. I was trying to space them so the boards would sit over the wall top ends.

Add Concrete Blocks
I’ll model some concrete blocks to support the floor.

The Metal Roof
For the metal roof I’ll draw a rectangle by connecting the four corners of the roof strapping. Then push/pull this face the overall thickness of the roof.


And I can make a small overhang by push/pull on each edge. Two inches on the front and back, and 1 inch on the sides. Metal roof panels come in various widths depending on the shape and supplier you go with. For the purposes of this 3D model, I just made it as one big sheet.
Final Touches to the Design
Last of all I decided to make the front and rear facia one long board instead of two. So I can delete one of them, and pull the existing one out to the other side.


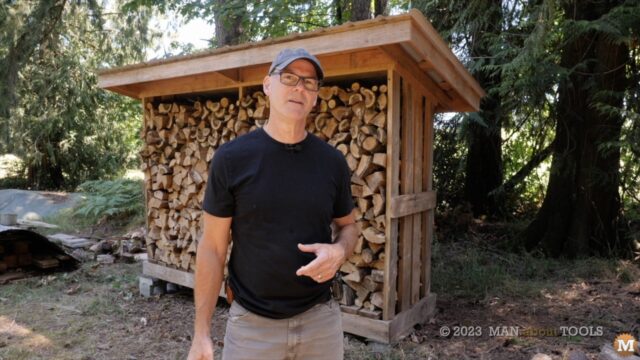
I think that looks pretty good. I’d say the model is done. In the next blog post and video I’ll move on to creating the drawing and animation. And that’s coming up right away. Thanks for watching and leave me any comments or questions below. And, if you like the format of this video or want to see more like it. Bye for now.