Add Stops to my Workbench
On the upper corner of my bench I attached two strips of plywood at 90 degrees. This will make stops to hold the brace pieces at right angles while I assemble them.

To support the angled brace piece of the shelf bracket I attached a half inch thick piece of particle board to the bench top. This will lift the brace piece so it is centered. As it is lying on its side.

Next, I’ll add some pencil lines for my screw locations. I set my combination square to half the 2×3 width. You could really just eyeball these, it’s not critical.

I like to drill pilot holes with a one eighth bit — even though I’ll be using self-drilling GRK screws for assembly. I just find it pulls the parts tighter together this way.

Assemble the Greenhouse Lower Shelf Brackets
And I’ll add some exterior wood glue at the mating surfaces.

I’ve been criticized in other videos for using glue on end grain like this. I know it doesn’t add much additional strength to the joint but, it does seal the gap (if any), and should help prevent water from seeping into the end grain of the wood. So for that alone, I’ll keep adding glue far all this assembly.
And I’m using #9 2-1/2″ GRK screws to assemble these brackets and the upper and lower shelfs.

To attach these brackets to the studs in the greenhouse, I’ll use some 5/16″ x 4″ GRK washer-head lag screws. I’ll drill two pilot holes in the bracket now.
(Disclaimer: As an Amazon Associate I earn from qualifying purchases. Thank you for helping to support my content this way. )

The upper pilot hole on a slight angle so my driver and bit will clear the angle brace.
Cutting Pieces for the Lower Shelf
Now I’ll cut some 2×3’s for the cross members of the bottom shelf.

And the front edge of the shelf is a 2×4. I decided to make this unsupported front edge thicker to reduce any sag that we might get with a loaded shelf.
This 2×4 is cut to length then taken to the bandsaw to have two additional cuts on each end. This is so the front edge sits at the same level as the 2×3’s. And I like the look. A jigsaw could also be used to make these cuts. Or even a handsaw.


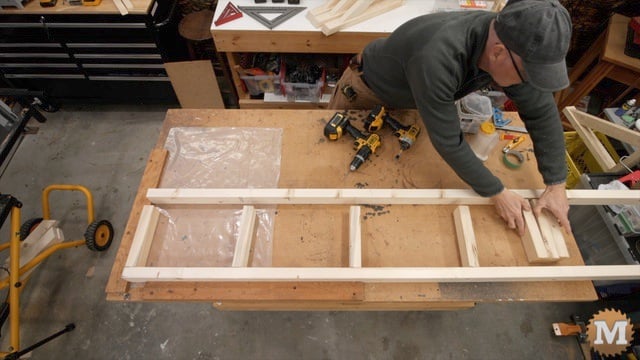
Layout the Lower Shelf Parts
I can now lay out these pieces of the lower shelf on the bench. I cut a 45 degree brace for each corner.

I marked and drilled pilot holes then I started a screw in each of these. Then add glue and screw it all together. And the stops on the bench helped to keep everything square as I went along.

And finally those two corner braces are added. Then the final missing screws on the front. Those holes were covered by my plywood stops.

The bottom shelf is built in two 4 foot long sections. This was to make assembly and placement on the brackets easier for me.
Assemble the Upper Greenhouse Shelf
The upper shelf is made in one 8 foot long section as it’s only 12 inches wide.
I can now lay these pieces on the bench and get ready for assembly. And like the lower shelf I marked then drilled pilot holes, started the screws, added glue, then methodically screwed it all together.

Upper Shelf Simple Braces
This upper shelf has 4 braces to support it. I’ll cut those now on the miter saw. A 30 degree on one end. Then a 60 on the other. And I can use a small speed square to mark these before cutting.


The 30 degree cut end will be attached to the underside of one of the shelf cross members. And the other end will be screwed to the stud in the greenhouse.
I used a drill block for the hole in the 60 degree cut end. I made a cross with pencil on this angled cut — then held the drill block in place to drill the pilot hole.

And this was easy to do as there’s a large flat spot for the drill guide. And the hole was perpendicular to the face.
Improvised Drill Guide
For the other end, I would need to angle the pilot hole. To help with this, I made my own improvised drill guide. I first drilled a hole with the drill block through a short piece of 2×3. Then on my miter saw I cut the block at a 30 degree angle.


Pencil marks on this block help me line things up. And this worked well enough. It got my pilot hole in roughly the spot I wanted to attach this brace.
And I can then countersink those pilot holes to allow for the screw head. Now I’ll apply some glue and run in a #10 x 4″ screw. And I’ll check that placement with a framing square.


I’ll repeat those steps for the remaining three braces. I did decide to add an additional screw at this location to keep the brace from rotating while the glue was setting up.


