Make the RAFTERS
The pattern is traced on the rafter blank.

We cut the 12 degree angle in the upper and lower ends of the rafter with a circular saw.

We cut the curved sections of all our rafters on a large bandsaw.

But, if working alone a jigsaw cuts almost as well. I use a heavy, stiff blade on my jigsaw for this 2″ thick Western Red cedar.

My friend Doug is a very artistic and skilled carpenter. We worked on quite a few design ideas for the curved rafters. We wanted the most elegant curve with the minimal waste of material. We decided on the idea of pairs of rafters that were supported with a ridge beam. And that each rafter tapered down from the center top to the sides. This was done by using two different radius curves. The homeowners approved the design and we all thought it looked a bit like an upside down wooden boat hull.

Each rafter was then chamfered with a sanding attachment on an angle grinder.
Sanding Curved Rafters


These rafters were set in place and toe screwed to the beams. And also screwed to the galvanized strapping attached to the ridge beam.
Attaching Rafters
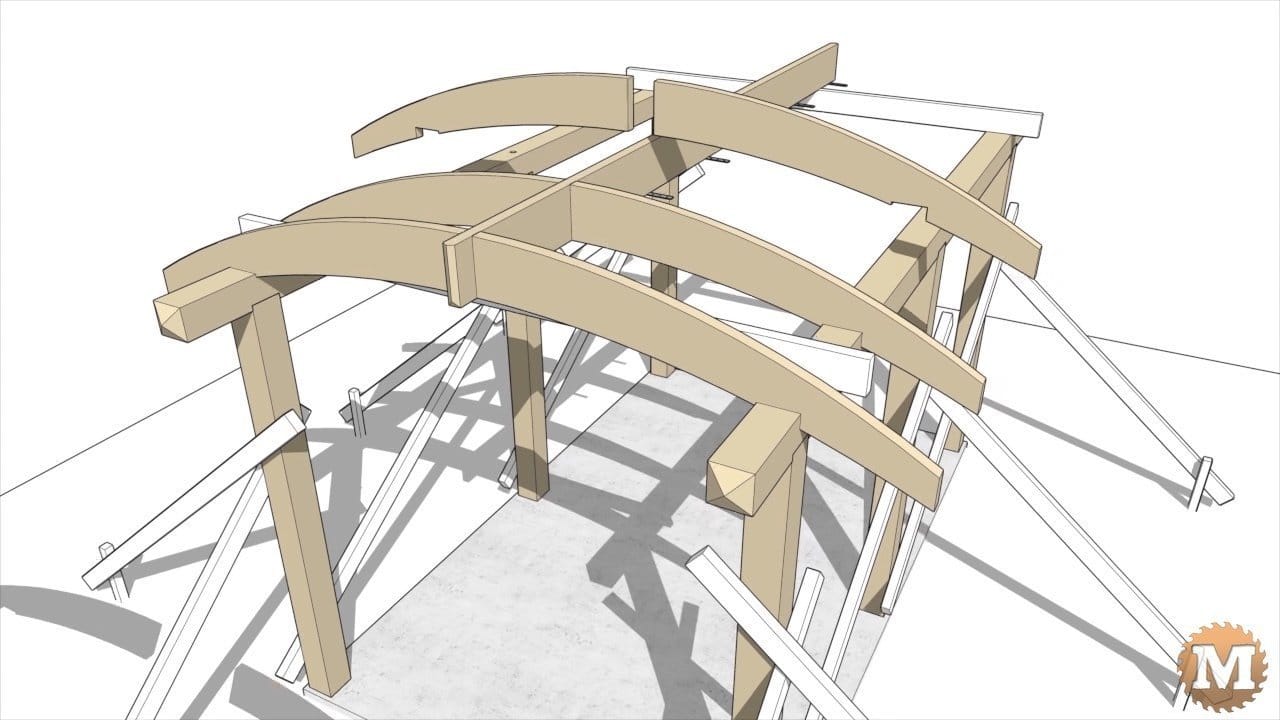
Then the temporary supports for the ridge beam can be removed. Or left there until all the braces are added.

The BRACES
The pergola design called also for curved braces. A pattern is also cut for the two brace shapes. Again I use 1/4″ plywood for the two patterns.
(Disclaimer: As an Amazon Associate I earn from qualifying purchases. Thank you for helping to support my content this way. )

The curves will be scored with nails through a yardstick-size piece of plywood with a pivot laid out on my workbench.

I mark the pivot and two curve radii then drill pilot holes. Then tap in finishing nails.

On the small brace pattern I mark the two 45 degree angles first. Then I nail the blank to the workbench.
Sweeping Curves onto Brace Pattern

Along a pencil line on the bench I tap in the pivot point nail then sweep the yardstick along the blank to scratch the curve on the plywood. Then draw a pencil line along this scratch. I darkened it with a sharpie as well.

The 45 degree angles were cut on the miter saw.

The second, slightly larger brace pattern was made in the same way.

The plywood blank is bigger and the radii that I need to scratch in the wood is also greater.

As before I make a compass for striking the arcs from a thin strip of plywood, measure and drill pilot holes, and tap in some finishing nails.
Darken Scratch Marks

I mark the points for the 45 degree cuts then secure the blank and the compass pivot to the bench. Then scratch the arcs on the wood. Then darken the curves and take the blank to the miter saw.

I use a bandsaw to cut the brace pattern curves. A jigsaw would also work just fine.

Then I sand these curves smooth on a small belt sander.
Small Tool is a Big Help

Both patterns only took a few minutes to finish. This little sander is so handy, I use it a lot.

