Build a Stunning DIY Timber Frame Pavilion
Are you looking to create a functional, attractive outdoor workspace or patio cover? In this guide, I’m walking you through the construction of a 9×12 foot Post & Beam Lean-To Pavilion. This project uses beautiful Douglas Fir timbers and simple construction techniques that make timber framing accessible to almost anyone.
Whether you need a spot to work on projects out of the rain or a stylish shelter for your backyard BBQ, this build is designed to be sturdy, straightforward, and visually striking.

Project Overview
The structure features a gentle 8-degree roof slope, which sheds water effectively while keeping the profile low enough to fit under eaves or trees. I used rough-sawn 6×6 posts for the main structure, giving it that heavy, authentic timber-frame look without the complex mortise and tenon joinery often required for traditional builds.

Step 1: Foundation and Anchors
The build begins on an existing concrete pad. I secured four galvanized post saddles using strong anchor bolts. This is crucial for keeping the timber off the damp concrete and ensuring a rigid connection to the ground.

Step 2: The Post & Beam Framework
Once the saddles were set, I installed the four 6×6 Douglas Fir posts. To connect the tops, I used 6×6 beams bolted securely with galvanized lag bolts.
For the cross-ties (the beams running front-to-back), I cut simple dados into the tall posts. This allows the 2×6 cross-ties to “sit” inside the post rather than just hanging on bolts, significantly increasing the shear strength of the joinery.

(Disclaimer: As an Amazon Associate I earn from qualifying purchases. Thank you for helping to support my content this way. )
Step 3: Bracing for Stability
No timber frame is complete without bracing. I added 4×4 corner braces to stiffen the structure and prevent racking. I also added lap-cut braces connecting the posts to the cross-ties for extra rigidity.

Step 4: Rafters and Strapping
With the main frame done, I laid out equally spaced 2×6 rafters. To support the metal roofing, I ran 1×8 cedar strapping perpendicular to the rafters. This creates a solid grid for the roofing screws to bite into and adds a nice visual detail when looking up from underneath.

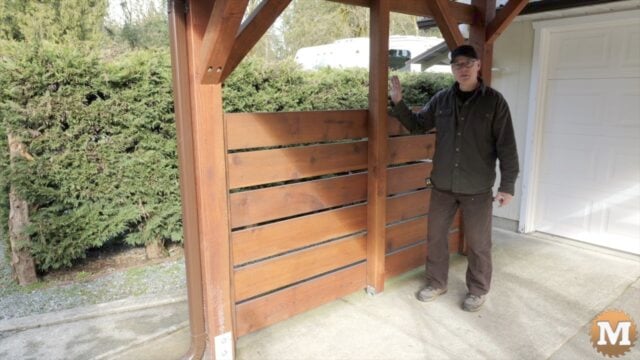
Step 5: Roofing and Privacy Wall
I finished the roof with durable metal panels attached with rubber-washer screws to prevent leaks. Finally, to separate the space from the neighbors (and block the wind), I framed a simple privacy wall on one end using an extra post and horizontal 1×8 cedar boards.
Ready to Build Your Own?
This project was a quick build with a high payoff. If you want to replicate this exact structure, I have detailed plans available that include all the dimensions, cut lists, and material requirements.